The is the second in a series on our 1970 Honda CB350 build project. Start at the beginning with Part I, and read Part III, Part IV, Part V,Part VI, Part VII and Part VIII for the later installments. You can also watch video of our Honda running for the first time.
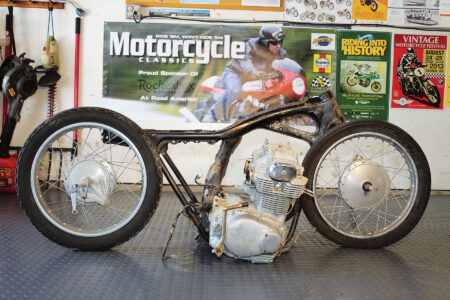
Constructive deconstruction. It’s the tear-down phase of any project and usually the most fun, whether it’s a bathroom rehab or, in this case, our basket case 1970 Honda CB350. Given the appearance of our project bike, that bathroom analogy turns out to be oddly apt, because frankly, our Honda looks like, well, you know …

When we unveiled our Honda project bike last issue, we gave a quick rundown of its attributes, listing the good, the bad and the ugly. There’s lots of ugly, no question, but the deeper we get into this old Honda the better it looks. For one thing — and it’s a major thing — we’ve proven it actually runs. Not only that, it actually runs quite well, blessedly absent any ugly smoke out of the tail pipes and with almost zero mechanical noise. Will wonders never cease?
First run
In our first report, we noted that we were going to make sure our Honda actually runs before going to the work of stripping it down. Well, to our surprise (and maybe we shouldn’t have been; aren’t old Hondas legendary for miraculously coming back to life after years of slumber?), it didn’t take all that much to get the old girl firing on both cylinders. We knew the carburetors would have to be overhauled if we were to have any hope of getting it running, so we tackled that first. As you can see in our How-To on page 76, an overnight soak in a gallon can of Gunk followed by a bath in our ultrasonic cleaner brought them back to rebuildable form. With new floats, diaphragms and jets they were good to go, and even looked good, to boot.
Encouraged, we pushed on. We put the carbs back on the bike (sans cables; they’re locked solid), and after giving the header pipes a quick clean (a completely unnecessary but somehow rewarding act) we bolted them up to the engine. We didn’t use new gaskets — why bother, it’s just going to come back apart — and we didn’t worry about installing the mufflers.
The gas tank petcock is seized shut, so for a fuel supply we bungee-corded a donor tank from a lawn mower to the frame. For electrical power, we assumed we’d have to bypass the main wiring harness, which, in a word, looks a mess.

Yet looks can be deceiving, because unbeknownst to either editor Hall or myself, Tech Q&A man Keith had already made the engine burp after jumping a battery to the stock wiring and spraying a little starting fluid into the intakes — without the carbs attached! Based on that, we figured what the heck, let’s give it a go, and ran jumper wires from a battery to the main fuse and to the factory ground. The moment of truth was upon us.
After letting fuel flow from the donor tank to the freshly rebuilt carbs (which showed no leaks, always a good sign), we turned on the ignition at the key and gave the bike a few kicks. Nothing. We checked to make sure there was power at the coils — there was — and after letting it sit for a moment we turned on the chokes and tried again; this time the engine spit out a quick harrumph. This was looking good, so we just kept swinging away at the kickstarter, alternating between choke/no choke while pulling the throttles by hand. After a bit of barking and coughing it finally caught and, to our amazement, started to run. Not on both cylinders, mind you, but it was running. And then it wasn’t.

Keith suspected that both points were dirty and that one set wasn’t contacting at all; the right cylinder was cold, so clearly nothing was happening there. After another check of the electrics we got it started again, and while I kept the throttle steady Keith blasted the ignition points with brake parts cleaner. It continued running on one cylinder, and then suddenly, Eureka! It cleared out and was running on two. Incredible. We kept it going for a few minutes, running it up and down the rev band, and the warmer it got the better it ran, with nary a hint of smoke or mechanical noise. If I held the throttle plates just right it even idled, and smoothly. You can watch a video of our first start at MotorcycleClassics.com/Honda-first-fire.
Tear down
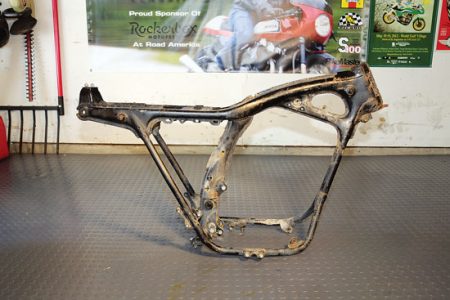
Proving that the engine runs is a major milestone. We were hoping we wouldn’t have to tear into it, and the way things look, we won’t. The camshaft bearing blocks appear OK, and it looks like we’re getting adequate top-end lubrication, an issue with these engines if they don’t get regular oil changes. With that settled we turned to stripping the bike down to the frame, a process that, given the bike’s already partially stripped state, didn’t take too long.

First to come off was the wiring harness. Once that was out of the way it was time to remove the engine, which was a fairly simple matter of removing the carbs and header pipes, followed by a half-dozen mounting bolts. After that we just tilted it up and pulled it out the left side of the frame, even though the manual says to pull it out to the right. Next we removed the front wheel and the rest of the front end, followed by the rear wheel and swingarm. All told, it took less than an hour to strip it to the frame.
Thankfully, the tear down produced few surprises, the only one of note being the broken lower left front frame-mounting boss on the engine casting, a point not visible until the engine was unbolted. That’s going to require a trip to aluminum welding guru Bruce Silkey, the only guy we know who can weld up a blown Indian or vintage Harley V-twin engine case without leaving a clue that it’s anything but stock and original.

Now that we’re heading out of the constructive destruction phase, we’ll start focusing on build details. The frame will go off to Stuart Armstrong at Custom Coatings & Metal for media blasting and powder coating, but we need to decide how we want to prep the engine. Friend of the magazine Tim O’Mahoney claims he’s discovered the perfect duplicate to Honda “Cloud Silver” engine paint, and we’ve also considered vapor blasting.
There are myriad details to attend to, including sourcing a new wiring harness, fixing the headlight bucket, rebuilding the forks and the rear suspension, and putting together a more coherent plan of action. We’re pretty happy with how things are moving along with our project Honda, and by the next issue we expect to have made some good progress. See you then. MC
Project Honda CB350 Suppliers
Better Life Technology: G-Floor vinyl shop flooring
Buchanan’s Spoke & Rim: Replace wheels with Mandap chrome rims and chrome spokes
Charlie’s Place: Electronic ignition, ignition coils and mounts, voltage regulator/rectifier
Custom Coatings & Metal: Media blasting and powder coating
Dime City Cycles: Tapered steering head bearing kit, miscellaneous hardware
Hagon Shocks USA: Classic I chrome shocks
Millenium Technologies: Custom machine work
Sirius Consolidated: Master carb rebuild kit, seat foam, seat cover, seat strap and buckles


