Telescopic forks first appeared on the 1908 Scott; BMW added hydraulic damping to telescopic forks in 1935; and today, most motorcycles use telescopic forks. Telescopic forks have an inner and outer tube, a spring, damping mechanisms, seals, and hardware to hold it all together. Forks are secured to the motorcycle by upper and lower yokes with pinch bolts to clamp the forks in place. Forks need to be serviced at manufacturer-recommended service intervals (10,000 miles for the 1974 850cc Moto Guzzi El Dorado featured here), if the forks leak oil, or if the forks simply do not feel right. Fork service involves fork removal from the motorcycle, disassembly, component cleaning and inspection, seal and o-ring replacement, oil replacement, and replacement of any damaged or worn components. The steps shown here are similar for any motorcycle with telescopic forks, with four caveats:
- Like most motorcycles of the era, the forks shown here are not adjustable for spring rate or damping.
- Our Guzzi’s forks contain an internal damper that does not use fork oil for damping (most motorcycles do).
- Many modern motorcycles have inverted forks (sometimes called upside-down forks), with the large diameter tube on top and the small diameter tube on bottom. The principles for servicing these forks are the same.
- On some motorcycles, fork oil can be drained via a drain plug, and replenished through an upper fork tube cap. On our Guzzi’s forks, fork removal and disassembly is required.
Preliminary steps (not shown here) include securing the motorcycle, lifting the front end, removing the front wheel, removing any components attached to the forks, and removing the forks from the motorcycle. This article assumes those actions have already occurred.
Tools and required materials include a vise with suitable jaw covers to prevent component damage, oil, wrenches (including Allen wrenches), retainer clip pliers, a seal puller, a graduated vessel for measuring fork oil volume and pouring oil into the tubes, a container to catch the old oil, replacement seals and o-rings, a flashlight, and shop rags.
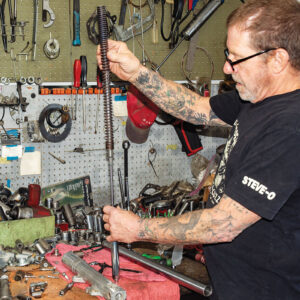
Our thanks go to Cycle Garden in Indio, California, for this article. Cycle Garden specializes in servicing and restoring pre-1975 Moto Guzzi motorcycles (their restorations are rolling art); they are the “go-to” shop for anything vintage Moto Guzzi. Steve Howlett, one of Cycle Garden’s master technicians (and all-around good guy) guided us through the process.
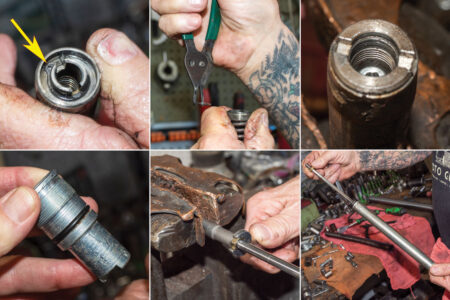
1. Lower fork disassembly and seal removal
Secure fork assembly in a suitable vise with brass or lead jaw covers to prevent damaging fork lower. Do not overtighten vise. With fork lower secured in vise, remove seal retainer clip above fork seals (if forks leak oil, one or more fork seals are most likely responsible). Most motorcycles use a single seal for each fork leg; the Guzzi uses two (it has redundant seals in each fork leg).
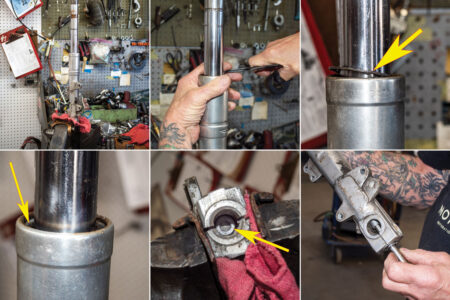
To drain oil from the fork, loosen large Allen bolt and drain bolt at fork lower’s bottom. Remove fork from vise, angle it down, and remove large Allen bolt (this bolt attaches fork lower to fork upper assembly) and Allen bolt drain plug. Note that both Allen bolts have crush washers; keep these with their respective bolts. Do this above an oil drain pan; when Allen bolts are removed, fork oil will drain from fork lower.
After oil has drained from fork lower, remove fork upper assembly from fork lower. Fork upper assembly (upper tube, upper plug, spring, spring cap, damper, damper rod, spring retainer, and retainer clip) can be removed from fork lower as a single assembly. Using a shop rag to prevent scratching, reposition and secure fork lower in vise. Place shop rag or other suitable protector between seal puller and fork lower, and carefully pry both seals from fork lower. Discard seals; they will not be reused.
2. Upper fork disassembly
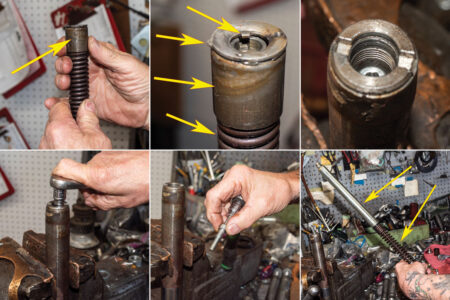
Remove spring cap from spring. Note that spring cap has indexing plate with inner diameter projections that align with spring retainer. Note also that spring cap has tab on outer diameter to align with fork lower. Secure fork upper assembly in vise with spring facing down. Remove Allen bolt securing damper and spring from upper plug (hold damper and spring while doing so), and remove damper and spring from fork upper tube. Invert spring on workbench and pull down on retainer to remove spring tension on retainer clip. Remove retainer clip and slide spring from damper and damper rod.
Unscrew fork upper plug from fork upper tube with flat bar. There is an o-ring between fork upper tube and upper plug that sometimes extrudes into threaded interface; this can make disassembly difficult. Apply heat to fork tube in upper plug area if necessary to facilitate unscrewing upper plug.
Secure damper rod in vise. Loosen locknut and remove damper from damper rod.
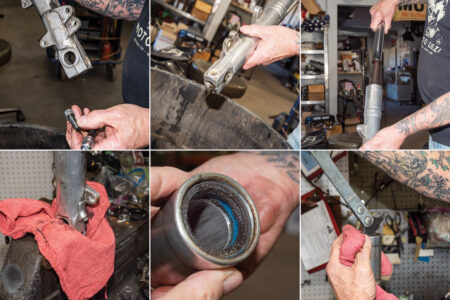
3. Component cleaning and inspection
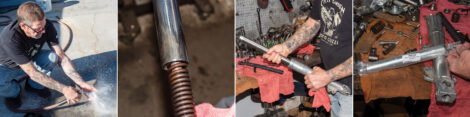
Clean all metal parts with degreaser, rinse with water, and thoroughly dry. Inspect all metal parts (especially fork upper tube outside surfaces and fork lower inner surfaces) for scratches or gouges as these may damage seals. Insert fork upper tube into fork lower and check for fit, smooth action, and minimal clearance. Replace any damaged parts. (If forks previously leaked oil, rough surfaces on fork upper tube or fork lower inside diameter will result in new seals leaking again.)
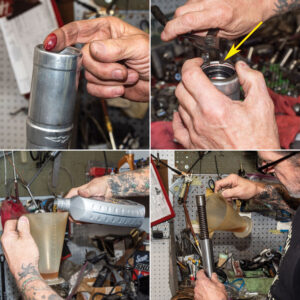
4. Fork assembly
Assembly is reverse of disassembly, with key activities described below.
Replace fork upper plug o-ring and fork lower seals. When installing fork lower seals, secure fork lower in vise and apply grease to fork lower interior seal seating area before inserting new seals. When inserting new seals, make sure seal open area points down (toward front axle) on both seals.
Manually check damper action. If either damper is jerky or otherwise not smooth, replace both dampers (always replace dampers in pairs).
Apply oil to upper plug o-ring and reassemble fork upper tube, upper plug, and o-ring. Reassemble damper and damper rod, spring, spring retainer, and spring retainer’s retainer clip. Use Allen bolt to attach damper and spring assembly into fork tube upper.
Invert fork tube upper assembly and secure in vise. Measure 50cc of 10w30 motor oil and pour into inverted fork upper assembly (our 1974 Moto Guzzi El Dorado requires 50cc for each fork leg; consult your shop manual for type and amount of oil your motorcycle requires).
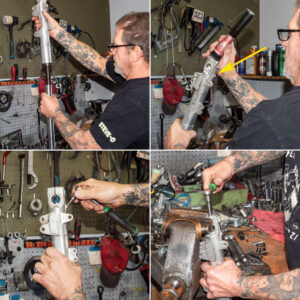
Carefully guide fork lower over fork upper assembly, taking care not to damage new fork seals, and making sure fork spring indexing tab seats properly in fork lower (this is best viewed through fork drain plug hole). Install fork lower Allen bolt and crush washer (it screws into damper rod). Install fork drain Allen bolt and crush washer into fork lower.
Repeat above process for other fork leg.
At this point, assembly is complete; both fork legs can be secured in upper and lower fork yokes.
Special thanks to Cycle Garden’s Steve Howlett for this demonstration.
Cycle Garden is the world’s largest full-service Moto Guzzi restoration and maintenance operation. They keep an extensive inventory of new and used Moto Guzzi parts in stock. If you need any of the parts described above, visit www.CycleGarden.com or call 760-972-4800.


