There’s an old saying that 99 percent of all carburetor problems are electrical. True as that may seem sometimes, the simple fact is, if your Amal carburetted British motorcycle isn’t running as well as it should, a quick checkup and rebuild of the Amal Concentric carburetors might be just what the doctor ordered to get you back to running well.
Poor idling, uneven acceleration and misfiring can all be symptoms of a dirty carburetor or carburetors. Thankfully, Amal Concentrics — standard fitment on just about every classic British motorcycle built from 1966 to the late 1970s — are very simple devices. And that means cleaning them is easy if you use a little care. Depending on your bike, you’ll have from one to three of them to clean, so the time involved can range from as little as a few hours to all day, with removal and installation often taking the longest part. That’s particularly true with BSA and Triumph triples, where the gantry assembly used to synchronize all three carbs complicates the process.
Once the carbs are off your bike you’ll only need a few tools to do the job properly, including: a medium Phillips screwdriver for the screws on the top and the float bowl; a small flat-blade screwdriver for the throttle speed and idle mixture screws; and 8mm and 13mm wrenches to remove and replace the jets. You’ll also want a gallon bucket of carburetor cleaner (with a parts basket to soak the metal parts), and a couple of parts tubs will come in handy to keep parts organized.

You’ll also need replacement gasket kits equal to the number of carburetors you are cleaning, and it’s usually a good idea to get new float needles, as well. As always, a good manual specific to your bike is indispensable, and if you don’t have an Amal manual, Google “Amal Concentric Manual” to find one online — you’ll want one for final tuning.
To get started, remove the air cleaner(s) then the carb(s) from your bike, using a 13mm wrench to unbolt the carb flange from the intake. On Nortons it’s often easier to remove one carb complete with its intake stub, as the inner carb flange nuts are hard to reach with both carbs installed. Remove the carb top using a Phillips head screwdriver and withdraw the air slide and choke slide (if the choke is installed). If you want, you can leave the carb top with the slides connected and hanging from the cables and clean them with a rag and solvent, or you can remove them and dip them in the carburetor cleaner. It’s often easier to just leave the cables connected, as disconnecting and reconnecting them can be a hassle.
However, if you decide to remove the slides, the procedure is pretty straightforward. With the carb top off and slides out, pull the choke slide out of the main air slide. Next, compress the throttle spring and move it out of the way so you can remove the mixture needle from the slide, taking care not to bend it. The needle has a clip on it; take note of the groove the needle clip is in so it goes back in the same groove on reassembly. Typically, it’s in the middle groove; moving the clip up or down on the needle will change the fuel/air mix in the middle range of the throttle.
While compressing the main spring, push the slide toward the carburetor top, releasing the cable from the notch that secures it in the slide. Slip the cable over to the other side of its notch and the cable will come free from the slide. Finally, compress the choke spring and fish the choke cable out from the bottom of the choke, allowing the choke slide and brass spring guide to fall off.
While the overhaul process is straightforward, getting everything back together and dialed in takes time. Singles are easy to fine-tune, requiring little more than setting the idle stop and idle mixture screw (usually 1.5 turns out). Twins and triples require careful adjustment of the throttle cable and individual idle circuits, and synchronizing the idle stops.
With the idle stop screws backed all the way out, make sure the main air slides pull evenly. If not, turn the threaded barrels on the carb tops to adjust the individual cables until the slides pull at the same time. Next, turn each idle stop screw until it just lifts the air slide. Check cable pull again and adjust if needed. This will be your starting point for final tuning with the engine running. (Editor’s Note: For more tuning information and a detailed look at the Amal Concentric pilot or slow-speed idle circuit check out Bushman’s Carb Tuning Secrets, Jim Bush’s excellent Amal carb tuning page.

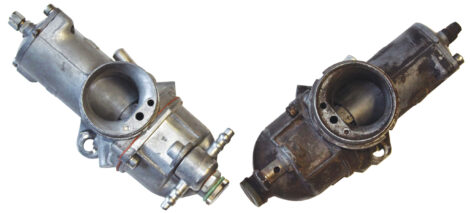
This is where the rebuild starts, and as you can see, it really doesn’t take much. Amal Concentrics are very simple, requiring few parts to renew and even fewer tools to rehab. Even so, a good manual is a great help.

Stripping the carb fully produces the parts shown here, including the choke and air slides and their springs, which can be left with the bike if desired.

After removing the two screws holding the float bowl and gently removing the bowl with the float, use a 13mm wrench to remove the main jet holder from the carburetor.

Next, use the 13mm wrench and 8mm wrench to separate the main jet and the needle jet from the jet holder. This photo shows the main jet being removed, with the needle jet at bottom.

With the idle set screw and idle mixture screw removed, use a suitable hook tool to remove the O-rings from the screws. Don’t worry if they rip, you’ll be replacing them.

With the carb stripped to its parts, place everything except the plastic float and the float needle into a carb cleaner solution like Gunk or similar.

Although you can get away with soak times as short as an hour, we like to leave parts in overnight to really get them clean. Remove the parts and rinse them with spray carb cleaner, followed by careful drying using rags or compressed air.

The carb kit contains two O-rings for the set screws, a small fiber washer for the fuel banjo, a large fiber washer for the float bowl drain plug, a float bowl gasket, a large carb-to-insulating washer O-ring and an insulating washer gasket.

To ensure the carb’s internal passages are clear, use compressed air and blow out the idle circuit from the float bowl side. Carb cleaner can be nasty stuff, so make sure to wear protective glasses for this operation.

Next, blow out the idle circuit from the set screw side, making sure air is flowing through to both the float bowl chamber and the venturi.

Blow out the needle jet and the jet holder with compressed air and screw the needle jet back into the threaded end of the jet holder as shown.

Likewise, blow out the main jet with compressed air and install it in the jet holder. Screw the jet assembly back into the carburetor.

Next, set the float with its float pin and float needle into place on the float bowl. Place the new float bowl gasket on top of the float bowl. Making sure the float bowl is properly oriented to the carb body, carefully attach it to the carb with its screws.

Find the idle mixture and idle set screws and gently roll the new O-rings into place. They should seat comfortably in their grooves.

Screw the idle mixture and set screws into place. Screw the mixture screw in until it just seats, then back out 1.5 turns. Fine-tuning and idle speed adjustment is done running.

Attach the fuel line banjo with its new fiber washer, followed by the float bowl drain plug and its fiber washer. Although we discussed leaving the carb top and air and choke slides on the bike, this and the previous photo show the slides and top in place.

Install the carb(s). These BSA carbs bolt directly to the head, with the large O-ring on the carb and an insulating washer gasket between the insulator and the head. Reassemble the slides.

With the slide reassembled, carefully slip it into the carburetor body, making sure the slide cut-out faces out. With the top screwed down you’re ready to start the engine and make final adjustments.


