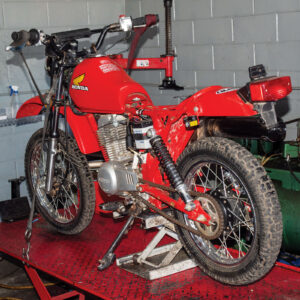
Motorcycle brakes come in two flavors: disc and drum brakes. This article addresses servicing drum brakes; a future article will address servicing disc brakes. Drum brakes are generally easier to service than disc brakes. The bike we are using as our demonstration mule is a 1983 Honda XL80S, and the expert who helped us is Emma Booton. We’ve mentioned Emma in these pages before; she and her Moto Town shop in Marina, California, created many of the concours-level restorations mentioned in our piece on Jameson’s Classic Motorcycle Museum in Monterey. Emma is well known in California (and beyond); the Jameson curator appropriately described her as a restoration goddess.
Required tools include the appropriate wrenches, a pair of pliers, a general-purpose grease, brake cleaner and shop rag, an old flat-bladed screwdriver, and potentially, a drift and hammer for pushing the axle from the hub. In the discussion that follows, most of the photos and explanations show the motorcycle’s rear brake. Disassembly, inspection, and reassembly operations for the front brake are similar.
We will use the following terminology in this article:
- Brake backing plate: The part to which other brake components are attached.
- Brake liner: The steel liner inside the wheel hub against which the brake shoes act.
1. Adjust Brake Actuation Free Play
The front brake should start to engage when the front brake lever is pulled in between a quarter and a half inch. If it moves more than this amount before the brake starts to engage, remove excess slack in the cable (first with the adjustment feature located on the front brake and then with the adjustment barrel at the brake lever). The rear brake should start to engage when the brake pedal is depressed between a quarter inch and a half inch. If the rear brake pedal moves more than this amount before the brake starts to engage, the rear brake actuation rod nut (often, a wing nut) at the end of the actuation rod should be tightened until the desired amount of brake pedal free movement is attained.
If the motorcycle’s brakes have been adjusted as described above and the brakes no longer feel effective, or if the brakes have run out of adjustment range, the brakes should be removed from the motorcycle, disassembled, and inspected.
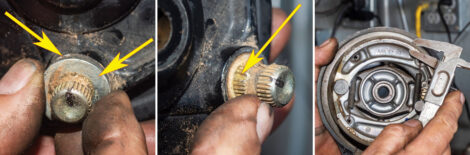
2. Check Brake Wear Externally
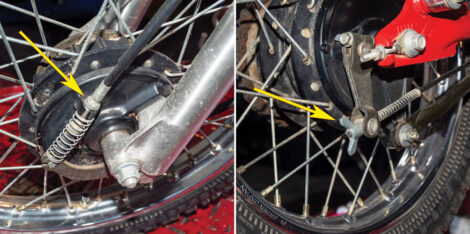
Some motorcycles have built-in external brake shoe wear indicators, as is the case on the rear brake of our Honda XL80S and many bikes. An external arrow on the wear indicator and a brake backing plate index mark serve this purpose. As the brake shoes wear, the brake shoe actuation lever must rotate further to bring the brake shoes in contact with the brake drum. When the wear indicator arrow reaches the brake housing index mark, the brake shoes need to be replaced.
3. Lift and Secure Motorcycle

When the adjustment ranges (as described above) have been fully taken up, or when the external brake wear indicator shows the brake shoes need to be replaced, or when the braking force diminishes, or when you simply wish to examine the brake internal components to assess their condition, it will be necessary to remove the wheel from the motorcycle, disassemble the brakes, and inspect brake components. Doing so safely requires lifting and securing the motorcycle.
4 Disconnect Torque Arm and Actuator Rod
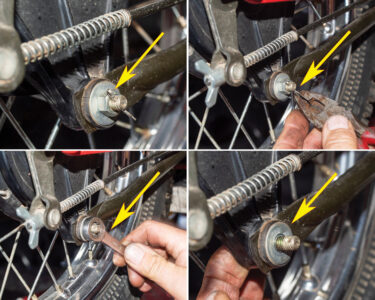
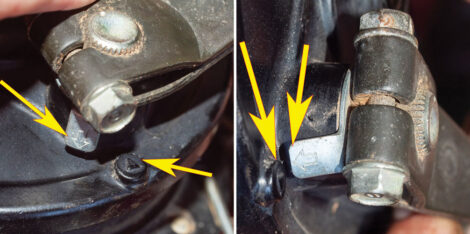
On the rear drum brake, a torque arm from the swingarm to the brake backing plate prevents the brake from spinning with the wheel when the brake is applied. On front drum brakes, the same function is typically achieved with slots on the fork leg that interface with a tab on the front brake backing plate. On a rear brake, the torque arm must be removed by removing the torque arm bolt’s cotter pin and castellated nut. Use a pair of pliers to squeeze the ends of the cotter pin together, pull the cotter pin from the castellated nut, and unscrew the castellated nut from the torque arm bolt. Set the castellated nut, the rubber washer, and the steel washer aside.
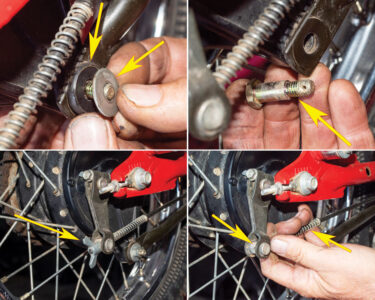
Disconnect the brake actuation rod by removing the nut that attaches the actuation rod to the barrel in the rear brake actuation lever. Rotate the actuation lever to the rear so that the actuation rod clears the actuation rod barrel. Set the nut, the barrel, and the actuation rod spring aside.
5 Remove Axle, Alignment Adjusters, and Wheel
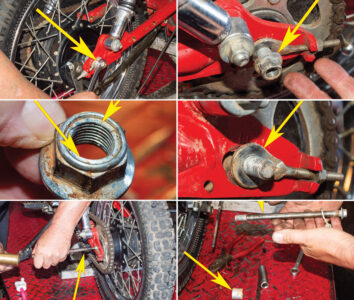
Loosen the axle with wrenches on both ends of the axle. Remove the axle nut from the axle. On some motorcycles, the axle nut has a cotter pin; others (as shown here) use a self-locking nut. Remove the wheel alignment adjuster on the side of the motorcycle opposite the axle bolt head. Using a drift from the sprocket side, and while supporting the rear wheel, push the axle from the hub. Push the rear wheel forward, lift the chain from the sprocket, and allow the chain to rest on the swingarm. Remove the left and right rear wheel spacers from the hub, noting the spacer width differences for reassembly. Set all parts aside.
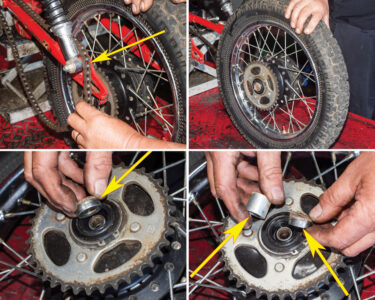
6 Disassemble and Inspect Brake Components
With the wheel off the motorcycle, remove the brake backing plate assembly from the wheel and then disassemble it for component inspection and replacement. This involves removing the brake actuation lever and the brake shoes. When removing the brake actuation lever, note that many motorcycles have alignment dimples to align the lever with the brake shoe actuation shaft. If there are no alignment dimples, mark the lever and the shaft to ensure correct alignment during reassembly.
Turn the backing plate over and examine the brake shoes. Some shoes may have a groove that serves as a wear indicator (if the brake shoes are worn down to or near the groove, they should be replaced). You can also measure the brake shoes while they are still on the brake backing plate. Check your motorcycle shop manual (or the internet) for model-specific recommendations for wear limits, but as a general rule, replace the brake shoes if the friction material is less than 1.5mm thick. Always replace brake shoes in pairs.
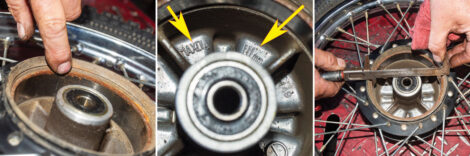
The hub has a steel liner that the brake shoes contact when the brakes are applied. Look for fractures, gouges, or other anomalies that could degrade braking. On some motorcycles, the hub will include a maximum inside diameter specification; if so, measure the inside diameter. If the liner is worn excessively or otherwise damaged, remove and replace the rear hub (the liner is not a replaceable component). This will require replacing the wheel (Buchanan’s Wheel Lacing Process). The good news is that this is not usually the case when servicing drum brakes. The hub’s steel liner should outlast many sets of brake shoes.
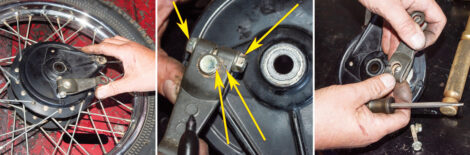
7 Brake Shoes, Springs, Actuation Shaft, and Dust Cover Removal
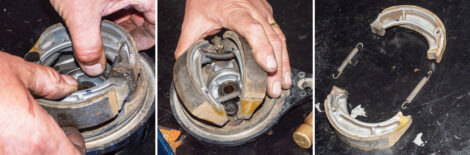
Lay the brake assembly face down and grasp the two brake shoes (one in each hand). Flex them upward (as if forming a V with the brake shoes). The brake shoes and springs will snap off the brake backing plate and can then be removed.
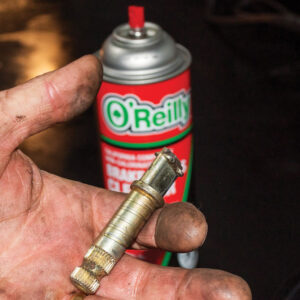
With the brake shoes removed, the brake shoe actuation shaft and the brake shoe actuation shaft dust cover can be removed from the brake backing plate.
8 Clean All Parts
Clean all parts with brake cleaner fluid. Do not use WD-40 or any similar silicone spray for cleaning brake parts, as the silicone it contains can migrate onto the brake drum and brake shoes and degrade braking capability.
9 Reassembly
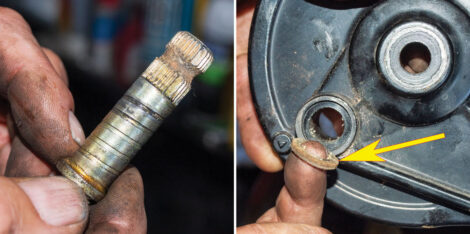
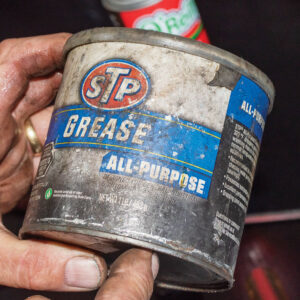
Reassembly is the reverse of disassembly after the brake parts described above have been cleaned, inspected, and replaced where necessary. The only parts that should be lubricated are the brake shoe actuation shaft (shown in the photo immediately above), the brake actuation rod’s nut, and the brake actuation rod barrel where it interfaces with the brake actuation lever. These parts should receive a very light coat of a good general-purpose grease (not oil). When greasing these brake components, recognize that less is more. Replace any cotter pins removed from the motorcycle (do not reuse cotter pins). If the rear axle’s self-locking nut’s locking feature is degraded, replace the nut. Assure that axle alignment/chain adjusters are properly located. Re-check all brake and axle-related fasteners you’ve worked with for proper tightness.
After reassembly, adjust the front brake lever and the rear brake pedal such that the front brake lever and the rear brake pedal have one-quarter to one-half inch of free play.
When riding the motorcycle the first time after installing new brake shoes, ride at low speeds initially and use the brakes several times to seat the new shoes.
That’s it. Your motorcycle brakes are now in good shape. Ride safely and ride often (as we say, Ride ‘Em, Don’t Hide ‘Em). If you’re looking for a good place to go, check the “Destinations” articles that appear in any Motorcycle Classics issue.


