


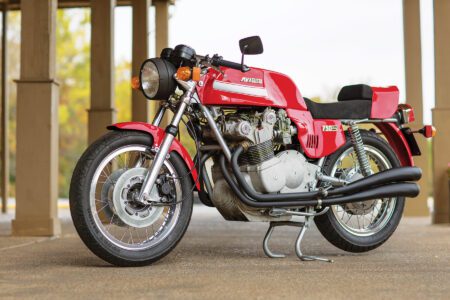
This How-To might seem a little out of sync with our mission, focusing as it does on a 1992 Ducati 750SS. The name of the magazine is Motorcycle Classics, we hear you say, so isn’t 1992 too new?
Believe it or not, it’s been 26 years since Ducati introduced the 750SS for the 1991 year, putting it just inside our general policy of only featuring bikes 25 years old or older. Hard as it is to accept, 1991 was, well, a long time ago. In the motorcycle marketplace, our project 1992 Ducati is just old. It’s at that awkward age where it’s neither fish nor fowl; somewhat ignored by lovers of more vintage machinery yet too outdated to be interesting to riders looking for modern hardware. It is in fact a potential bargain Ducati, perfect for riders who appreciate the brand and its heritage.
An updated version of the 750 Sport of 1988-1990, the 750SS featured improvements over the outgoing 750 Sport including a wet clutch — the first Ducati so equipped since the Cagiva Alazzura and Elefant — and a pair of 38mm flat slide Mikuni constant velocity carburetors in place of the 750 Sport’s troublesome single Weber. The Mikuni swap yielded improved performance, with none of the flat spots or hesitation experienced on the Weber-equipped 750 Sport. But with the youngest Mikuni-equipped bikes now 20 years old (fuel injection came in 1998), the likelihood of one of these bikes needing a carb rebuild is high.
Fortunately, Mikuni BDST flat slide carbs are easy to rebuild — even on a Ducati — and parts are readily available, if you know where to look. Surprisingly, the same sources that don’t list kits for the 750SS do list O-ring and float needle kits for 1992-1993 Yamaha TDM 850s, which used the same 38mm Mikuni as the Ducati 750SS. Going to eBay and typing in the search term “1992 Ducati 750SS carb kit,” we found a few vendors offering kits that included not just the O-rings and float needle, but all new jets, the slide needle and the atomizer tube. Those kits ran in the $52-$56 range (per carb). In the end, we opted for O-ring and float needle kits from Power Barn for $32 each.
We should note that this was not a comprehensive rebuild. Rather, it was sort of quick and dirty, to see if we could get this 750SS running again. Which we did, and quite nicely, thank you. Although we did not soak the carb bodies, our subject carbs cleaned up well using spray carb cleaner followed by compressed air to chase the orifices. If you do soak them, make sure not to soak any plastic parts, cleaning them individually instead.
This is a fairly straightforward project and well within the reach of the average weekend warrior. If you don’t rush it and give yourself the weekend, you shouldn’t have any trouble pulling the carbs on Saturday and reinstalling them on Sunday. Outside of a synchronizer, this job doesn’t require any special tools, and if you have the experience it’s easy to sync the carbs by ear and feel. Twins are nice that way, readily betraying when one cylinder is firing smoother than another.
As always, we recommend having a good shop manual on hand for parts identification and proper torque specs.
1. Remove the gas tank and air filter, the throttle and choke cables, then loosen the carburetor to manifold clamps and remove the carbs as a unit. Next, remove the fours screws securing the float bowl and cable bracket. This photo also shows the mixture screw and spring.
2. The plastic float assembly hinges on a plastic needle housing. The housing is a press fit into the carb body. Grasp the housing firmly and pull it straight up and out, complete with the float. It should release easily.
3. Remove the pin securing the float to the needle housing and separate the two, exposing the float needle. Thoroughly clean but do not soak the housing and float.
4. The jet block is secured to the atomizer tube. Remove the screw and collar securing the jet block, then remove the jet block. This also releases the flat slide body, as we’ll see soon.
5. As its name implies, the jet block contains most of the carb’s jets. Left to right above the block is the block retaining screw and collar, the main jet, the pilot jet retainer and the pilot jet.
6. The starter jet screws into the jet block. Removing the main jet first releases the pilot jet retainer. Remove the pilot jet, then unscrew the starter jet.
7. As noted in Step 4, removing the jet block releases the flat slide body. Turn the carb over and remove the two screws securing the CV cover. Remove the cover, followed by the slide spring. Push the flat slide up from inside the carb throat, then remove the flat slide and diaphragm. Next, pull the plastic flat slide body straight up and out of the carb body, as shown. The slide is at upper right.
8. Repeat this process on the other carb body. Clean the bodies and passages thoroughly, then blow them dry with compressed air, making sure to blow air through all the orifices to ensure they’re clean. Do not soak any of the plastic parts. Next, start the reassembly process by installing the new O-ring on the float needle body.
9. Next, install the new O-ring on the slide body at the base of the atomizer tube. This photo shows the new O-ring installed, with the old O-ring held for reference.
10. Next, lightly coat the O-ring with grease and reinstall the flat slide body in the carb body, making sure it’s pushed fully home. Gently turn the carb over to prepare to install the jet block.
11. After cleaning the jet block, blow it dry with compressed air, making sure all the jet passages are clean. Install the new O-ring from the kit, as shown.
12. Slip the jet block over the atomizer tube and onto the carb body, followed by the sleeve and retaining screw. Secure the jet block to the carb body. This also locks the slide body.
13. With the jet block installed, install the new O-ring on the pilot jet. Lightly coat the O-ring with grease and push the pilot jet into its bore in the position shown.
14. Next, after ensuring it’s thoroughly clean, screw the starter jet into its bore next to the pilot jet.
15. Place the retainer into position around the pilot jet, then screw the main jet into place, securing the retainer and pilot jet. Note that the retainer partially blocks the starter jet.
16. Slip the new float needle into place on the float tang. Slide the float seat over the needle, then reinstall the float pin. Make sure the pin is installed from the outside in as the float bowl acts to retain it. Lightly coat the float seat O-ring with grease and reinstall the float assembly. Put the new float cover gasket in place and reinstall the cover and the throttle cable bracket.
17. Turn the carb over and reinstall the slide and diaphragm. The slide will only go in one way. Install the new O-ring for the CV airway, visible here at approximately the 1 o’clock position. Install the slide spring and the slide cover.
18. Install the spring followed by the washer and new O-ring on the fuel mixture screw. Lightly seat the screw, then turn back out 1.5 turns for an initial set. Reinstall the carburetor set, accelerator and choke cables, airbox and gas tank, then start the engine and make final adjustments to the running engine.


